Battery switch on travel trailer function is crucial for managing your RV’s power. This guide dives into the hows and whys of these switches, covering different types, safe operation, troubleshooting tips, and even how they impact your appliances’ power draw. We’ll break down everything from connecting to shore power to diagnosing problems, ensuring you’re confident in handling your travel trailer’s electrical system.
Understanding your battery switch is key to a smooth and safe RVing experience. Proper usage prevents electrical issues, maximizes battery life, and ensures your appliances work as expected, whether you’re plugged into shore power or relying on your house batteries. We’ll explore various configurations and safety precautions, empowering you to become a more knowledgeable and confident RV owner.
Understanding Battery Switch Functionality in Travel Trailers
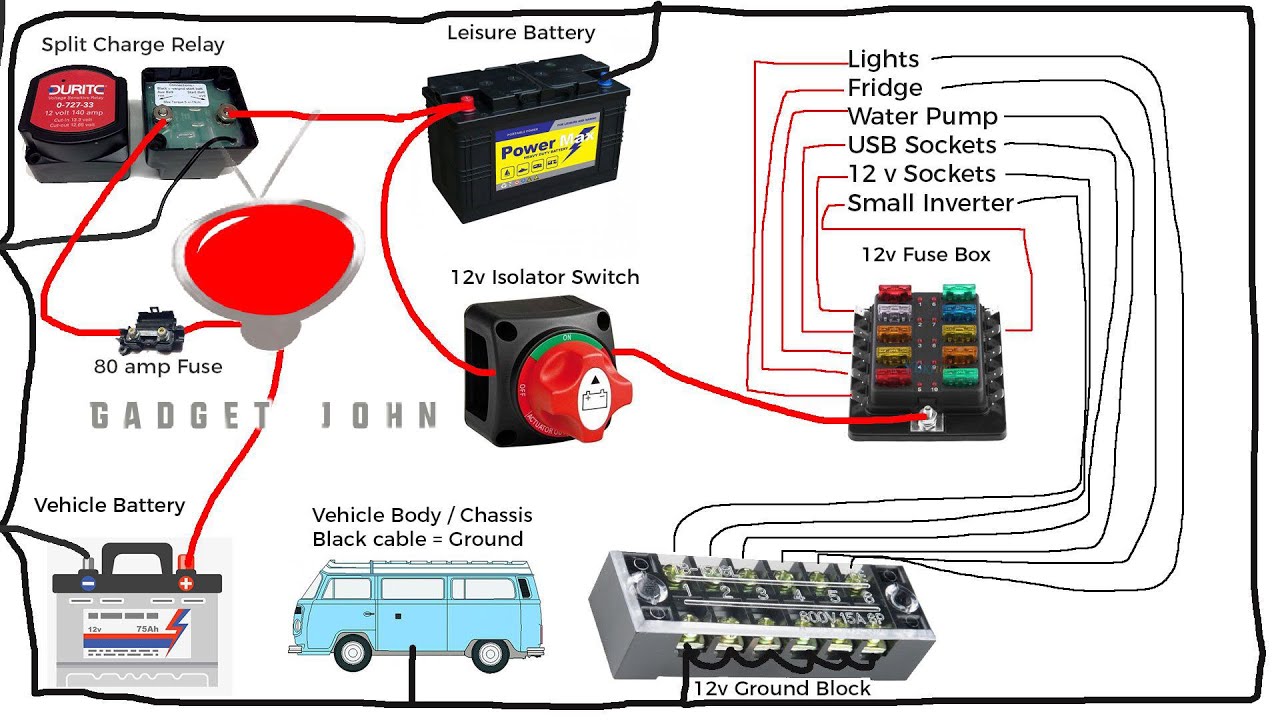
Travel trailers often rely on multiple battery systems for various functions. Understanding how your battery switch manages these systems is crucial for efficient power management and preventing costly mistakes. This section will explain the different types of switches, their purpose, and how to operate them safely.
Types of Battery Switches
Travel trailers typically use one of two main types of battery switches: a simple on/off switch or a more sophisticated selector switch. Simple on/off switches are the most basic, offering only the option to connect or disconnect a battery bank from the trailer’s electrical system. Selector switches, on the other hand, provide more control, allowing you to choose between different battery banks (such as house batteries and chassis batteries) or to completely disconnect all batteries.
Some more advanced systems might incorporate remote control capabilities.
Purpose of Battery Switches: Managing Power Sources
The primary purpose of a battery switch is to control the flow of power between your trailer’s batteries and its electrical system. Most travel trailers have two separate battery systems: house batteries, which power the interior lights, appliances, and other 12-volt devices; and chassis batteries, which power the vehicle’s starting system. The battery switch allows you to isolate these systems, preventing accidental drain on one battery from another.
This is particularly important for preventing the house batteries from draining the chassis battery, which would leave you unable to start your tow vehicle. It also allows you to charge only the house batteries or only the chassis battery, depending on your needs.
Operating a Battery Switch: A Step-by-Step Guide
Before operating any battery switch, consult your owner’s manual for specific instructions. The process will vary slightly depending on the type of switch. However, here’s a general guideline:
1. Identify your battery switch
Locate the switch, usually near your battery bank(s) or inside a junction box.
2. Understand the switch positions
Familiarize yourself with the switch positions. Common positions include “Off,” “Both,” “House,” “Chassis,” or similar designations.
3. Turn the switch to the desired position
Carefully turn the switch to the position that aligns with your needs. For example, to charge only the house batteries, select “House.” To charge both, select “Both” (if available). To completely disconnect all batteries, select “Off.”
4. Verify the connection
After switching, check that the intended circuits are active and functioning correctly. For example, if you switched to “House,” check if the interior lights are working.
5. Turn off the switch when not in use
Always turn off the switch when your trailer is stored for extended periods to prevent battery drain.
So, you’re prepping for a road trip in your awesome travel trailer? First things first: understand your battery switch on travel trailer function – it’s crucial for managing your power. Once that’s sorted, you can focus on the fun stuff, like setting up your killer audiophile travel setup for those epic sunsets. Make sure you pack extra cables, though – you never know what might happen on the open road!
Comparison of Battery Switch Types
| Switch Type | Advantages | Disadvantages | Cost |
|---|---|---|---|
| Simple On/Off Switch | Simple, inexpensive, easy to install | Limited control, no isolation between battery banks | Low |
| Selector Switch (Multi-position) | Greater control over power distribution, allows isolation of battery banks | More complex to operate, potentially more expensive | Medium to High |
| Remote Controlled Switch | Convenience, allows control from inside the trailer | More complex installation, higher cost, potential for electronic failure | High |
| Smart Battery Switch (with monitoring) | Advanced control, monitoring of battery voltage and state of charge | Most expensive, more complex to install and troubleshoot | High |
Connecting and Disconnecting Power Sources: Battery Switch On Travel Trailer Function
Switching between shore power and your travel trailer’s house batteries is a crucial aspect of RVing, ensuring you always have power, whether at a campsite or boondocking. Understanding how to safely and correctly connect and disconnect these power sources is essential for preventing damage to your equipment and avoiding electrical hazards.Connecting and disconnecting your travel trailer’s power sources involves manipulating the battery switch and shore power connection.
This process needs to be done carefully and methodically to avoid electrical shorts or damage to your batteries or electrical system. Always remember safety is paramount.
Shore Power Connection
Connecting to shore power is generally straightforward. First, ensure your shore power cable is properly plugged into the RV’s power inlet and the other end is securely connected to the power pedestal. Then, turn on the power at the pedestal. After confirming power is flowing into the RV, you can use the battery switch to select the appropriate power source.
Remember to always visually inspect the connections for any signs of damage or loose wires before turning on the power.
Disconnecting from Shore Power
Before disconnecting from shore power, always turn off all appliances and electronics within the RV. This prevents surges when disconnecting and protects sensitive electronics. Next, turn off the power at the pedestal. Then, carefully disconnect the shore power cable from both the RV and the pedestal. Finally, you can switch the battery selector to the battery-only position if you intend to run solely on battery power.
Battery Connection and Disconnection, Battery switch on travel trailer function
Connecting and disconnecting the house batteries to the system typically involves using a battery disconnect switch. This switch allows you to completely isolate the batteries from the RV’s electrical system. Turning the switch to the “off” position will disconnect the batteries, preventing accidental discharge or potential short circuits. The “on” position connects the batteries to the system, providing power when not connected to shore power.
Many battery switches have a third position for combining shore power and battery power.
Safety Precautions
Working with batteries and electrical systems requires caution. Always wear appropriate safety glasses to protect your eyes from potential sparks or acid splashes. Never work on the electrical system while it’s energized. Ensure your hands are dry to prevent shocks. If you are unsure about any aspect of the process, consult a qualified electrician or RV technician.
Furthermore, proper ventilation is important when working with batteries to avoid inhaling potentially harmful gases. Always have a fire extinguisher nearby when working with electrical systems.
Battery Switch and Connection Maintenance
Regularly inspect the battery switch and its connections for corrosion, loose wires, or any signs of damage. Clean the terminals with a wire brush and apply a corrosion inhibitor to prevent future corrosion. Ensure the switch operates smoothly and makes a firm connection. Tighten any loose connections. Regular maintenance will extend the lifespan of your battery switch and ensure reliable operation.
Power Source Switching Flowchart
This flowchart visually represents the sequence of actions when switching between shore power and battery power.[Imagine a flowchart here. The flowchart would start with a diamond shape asking “Connected to Shore Power?”. A “Yes” branch would lead to a rectangle “Turn off all appliances and power at pedestal”, then to a rectangle “Disconnect shore power cable”, then to a diamond “Battery power needed?”.
A “Yes” branch would lead to a rectangle “Switch battery switch to battery only”, and a “No” branch would lead to an end point. A “No” branch from the first diamond would lead to a diamond “Battery power available?”. A “Yes” branch would lead to a rectangle “Switch battery switch to combined/battery only”, and a “No” branch would lead to a rectangle “Charge batteries”.
Then it would lead to the end point.]
Troubleshooting Common Battery Switch Issues
Your travel trailer’s battery switch is a crucial component, and problems with it can leave you stranded without power. Understanding how to troubleshoot and fix these issues is essential for any RV owner. This section will guide you through identifying common problems, diagnosing faulty switches, and replacing them if necessary.
So, you’re prepping for your next adventure in your travel trailer? First things first: understand your power! Check out this guide on the battery switch on travel trailer function to avoid any dead-battery surprises. Once you’ve got the power sorted, think about entertainment; a killer audiophile travel setup can really elevate the experience.
Proper power management and awesome sound? That’s the recipe for a perfect trip!
A malfunctioning battery switch can manifest in several ways, from a complete lack of power to intermittent power fluctuations. Before you start tearing things apart, systematically check the most likely culprits to save time and frustration.
Diagnosing a Faulty Battery Switch
A methodical approach is key to diagnosing a faulty battery switch. First, visually inspect the switch itself for any obvious damage, such as loose wiring, corrosion, or physical damage to the switch mechanism. Then, check the connections to ensure they are tight and clean. A simple multimeter can be invaluable here. Test the voltage at the battery terminals and at the input and output terminals of the switch.
A significant voltage drop across the switch itself indicates a problem within the switch. If the voltage readings are consistent across all points, the problem likely lies elsewhere in your electrical system.
Replacing a Malfunctioning Battery Switch
Replacing a battery switch is a relatively straightforward task, but it’s crucial to disconnect the battery’s negative terminal before starting any work to prevent electrical shock. Once disconnected, carefully remove any wire connections from the old switch, taking note of their placement. Install the new switch, ensuring all connections are secure and correctly matched to their previous locations.
Reconnect the battery’s negative terminal and test the system to ensure proper functionality. Remember to consult your RV’s wiring diagram for accurate connection points.
Potential Causes for a Battery Switch Malfunction
Understanding the potential causes of a malfunctioning battery switch can help you prevent future problems. Here are some common issues:
Several factors can lead to a non-functional battery switch. These problems range from simple fixes to more involved repairs, emphasizing the importance of a systematic approach to diagnosis.
- Loose or Corroded Connections: Vibration and exposure to the elements can loosen or corrode connections, leading to poor conductivity and intermittent power. Clean the connections with a wire brush and apply a corrosion inhibitor.
- Internal Switch Failure: Over time, the internal components of the switch can wear out or become damaged, causing it to fail completely. This requires replacing the entire switch.
- Wiring Problems: Damaged or improperly connected wiring can prevent the switch from functioning correctly. Inspect all wiring leading to and from the switch for damage or loose connections.
- Incorrect Switch Setting: This might seem obvious, but ensure the switch is in the correct position (e.g., “Battery,” “Both,” or “Off”).
- Overload: Attempting to draw too much power through the switch can damage it. Check for any issues causing excessive power draw.
Battery Switch and its Impact on Appliances
Your travel trailer’s battery switch is the gatekeeper of your off-grid power. Understanding how it affects your appliances is crucial for maximizing battery life and avoiding unexpected power outages. This section will explore the relationship between your battery switch, different power sources, and your appliances’ power consumption.
The position of your battery switch directly dictates which power source fuels your appliances. With the switch in the “off” position, all appliances are disconnected from both the battery and shore power. In the “battery” position, your appliances run solely on power drawn from your trailer’s batteries. Switching to “shore power” connects your appliances to the external power source (campground hookup), bypassing your batteries unless specifically configured otherwise (like for battery charging).
Power Consumption Differences Between Power Sources
Appliances draw power differently depending on whether they’re running on shore power (120V AC) or battery power (12V DC). Shore power provides a consistent, higher voltage supply, allowing appliances to operate at their full rated power. Batteries, however, offer a lower voltage and limited capacity. This means some appliances might run slower or not at all on battery power, especially if the batteries are low.
For example, an air conditioner, designed for 120V AC, will not function on 12V DC battery power; a 12V DC fan, however, will operate directly from the battery.
Prioritizing Power Usage Based on Available Resources
Managing your power consumption is essential, especially when relying on battery power. If your batteries are low, prioritize essential appliances like your refrigerator (if it runs on 12V DC) and lighting. Avoid using high-power appliances like microwaves or air conditioners unless you’re connected to shore power. Regularly monitor your battery level using a voltmeter or battery monitor to make informed decisions about power usage.
Power Draw of Common Travel Trailer Appliances
The following table shows the approximate power draw of common travel trailer appliances. Remember that actual power consumption can vary depending on the appliance’s model and usage.
| Appliance | Power Draw (Watts)
|
Power Draw (Watts)
|
Notes |
|---|---|---|---|
| Refrigerator (12V DC) | N/A | 50-100 | Power consumption varies with model and temperature settings. |
| Air Conditioner | 1500-2000 | N/A | High power consumption; only use when connected to shore power. |
| Microwave Oven | 1000-1500 | N/A | High power consumption; avoid prolonged use on battery power. |
| Interior Lights (LED) | N/A | 5-15 | LED lights are energy-efficient. |
| Water Pump | N/A | 10-20 | Power consumption varies with usage. |
| TV (12V DC) | N/A | 20-50 | Power consumption varies with screen size and brightness. |
| TV (120V AC) | 50-100 | N/A | Power consumption varies with screen size and brightness. |
Battery Switch and Safety

Your travel trailer’s battery switch is a critical component for safe and efficient power management. Understanding its role in overall electrical safety is paramount to preventing accidents and protecting your investment.
Improper use can lead to serious consequences, so let’s delve into the specifics of safe battery switch operation.Proper grounding and bonding are essential for safe electrical systems, and your battery switch is no exception. Grounding provides a path for stray electrical currents to safely return to the earth, preventing dangerous voltage buildup. Bonding connects metallic parts of your trailer to equalize electrical potential, preventing stray currents from causing sparks or fires.
A correctly installed and functioning battery switch will be part of a properly grounded and bonded system. Failure to properly ground and bond your system can increase the risk of electric shock, equipment damage, and even fires.
Grounding and Bonding Importance
A properly grounded system ensures that any stray current flows safely to the earth rather than through your body or equipment. Bonding connects all metal parts of the trailer, creating a single equipotential plane. This prevents voltage differences between metal components, reducing the risk of electrical shock. Think of it like this: grounding is the safety valve, and bonding is the safety net.
Both are crucial for a secure electrical system. A visual inspection should reveal a solid grounding wire connected to the chassis and a network of bonding wires connecting metal components throughout the trailer.
Risks of Incorrect Battery Switch Operation
Incorrect operation of the battery switch can lead to several hazards. For instance, accidentally leaving the switch in the “on” position while disconnected from shore power can drain your batteries completely, leaving you stranded. Conversely, attempting to connect shore power while the switch is in the “on” position can create a dangerous short circuit, potentially damaging your electrical system or causing a fire.
Furthermore, improper handling during installation or maintenance can lead to loose connections, creating sparks and potential fire hazards.
Safety Tips for Battery Switch Usage
Always turn off the battery switch before performing any maintenance or repairs on your trailer’s electrical system. Never connect or disconnect shore power with the battery switch in the “on” position. Regularly inspect the battery switch and its connections for corrosion or loose wiring. Replace any damaged or corroded components immediately. If you are unsure about any aspect of your battery switch or electrical system, consult a qualified RV technician.
Remember, safety is paramount.
Visual Characteristics of a Properly Installed Battery Switch
A properly installed battery switch will be securely mounted, with all connections tight and free from corrosion. The switch itself should operate smoothly and clearly indicate its position (on or off). The wiring should be neatly organized and properly secured, and the grounding wire should be clearly visible and securely connected to the chassis. The switch should be easily accessible for operation and inspection.
Any signs of damage, corrosion, or loose connections warrant immediate attention and repair by a qualified professional.
Different Battery Switch Configurations
Choosing the right battery switch configuration for your travel trailer depends heavily on your power needs and how you intend to use your trailer. Understanding the differences between single, dual, and multi-battery setups is crucial for effective power management and preventing unexpected power outages. This section will break down the various configurations, highlighting their advantages and disadvantages.
Essentially, a battery switch acts as a central control point, allowing you to select which battery (or combination of batteries) supplies power to your trailer’s appliances. The number of batteries you have directly influences your available power capacity and runtime.
Single-Battery Setup
A single-battery setup is the simplest configuration. Your travel trailer is powered by a single 12-volt battery. This is common in smaller trailers with lower power demands. The advantage is its simplicity and low cost. However, a single battery limits your runtime, especially if you’re using power-hungry appliances like air conditioners or microwaves.
If the battery dies, you’re completely without power until you can recharge or replace it.
Dual-Battery Setup
Dual-battery setups offer significantly improved power capacity and runtime compared to single-battery systems. Two 12-volt batteries are connected, typically through a battery switch that allows you to select either battery, both batteries in parallel (for increased amperage), or to disconnect both batteries entirely. This configuration provides redundancy – if one battery fails, you can switch to the other.
It also extends the time you can run your appliances before needing to recharge or resort to shore power. The added cost of a second battery and a more sophisticated switch is the main drawback.
Multi-Battery Setup
Multi-battery setups, while less common in travel trailers, are used in larger RVs or those with exceptionally high power demands. These systems typically involve three or more batteries, often with sophisticated charging and management systems. The benefits are extended runtime and increased power capacity. However, the increased complexity and cost make this a less frequently chosen option for most travel trailers.
These systems often require specialized knowledge for installation and maintenance.
Dual-Battery Setup Diagram
Imagine two 12-volt deep-cycle batteries labeled Battery 1 and Battery
2. These are connected to a battery switch. The battery switch has three positions
“Battery 1,” “Battery 2,” and “Both.” The “Battery 1” position connects only Battery 1 to the trailer’s electrical system. The “Battery 2” position connects only Battery 2. The “Both” position connects both batteries in parallel, doubling the available amperage. From the battery switch, the power flows to the trailer’s distribution panel, which then supplies power to the various appliances.
A typical dual-battery setup would also include a charging system capable of charging both batteries simultaneously, either from shore power or via the alternator of the tow vehicle. This charging system may incorporate a battery monitor that displays the state of charge for each battery.
Mastering your travel trailer’s battery switch unlocks a world of efficient and safe power management. From understanding the different switch types and their benefits to troubleshooting common issues, this guide provides the knowledge you need for worry-free RV adventures. Remember, safety is paramount, so always prioritize proper procedures and consult a professional if you’re unsure about any aspect of your electrical system.
Frequently Asked Questions
What happens if I accidentally leave my battery switch on?
Leaving your battery switch in the “on” position while not connected to shore power will slowly drain your house batteries. This could lead to a dead battery and prevent your appliances from working.
How often should I check my battery switch connections?
Inspect your battery switch and connections at least once a season or before each trip. Look for corrosion, loose wires, or any signs of damage.
Can I use a different type of battery switch than what came with my trailer?
Potentially, but it’s crucial to ensure the replacement switch has the correct amperage rating and is compatible with your trailer’s electrical system. Consulting a qualified RV technician is recommended.
My battery switch is making a clicking noise. What’s wrong?
A clicking noise often indicates a problem with the switch itself or a low battery voltage. Check your battery levels and inspect the switch for any visible damage. If the problem persists, seek professional help.
